Dependencies
ROS2 Galactic을 설치하였으므로, Galactic 버전 설치 매뉴얼을 보고 진행하였다.
Source installation - Autoware Documentation
Source installation Prerequisites ROS For ROS 2 system dependencies, refer to REP-2000. sudo apt-get -y update sudo apt-get -y install git How to set up a development environment Clone autowarefoundation/autoware and move to the directory. git clone https:
autowarefoundation.github.io
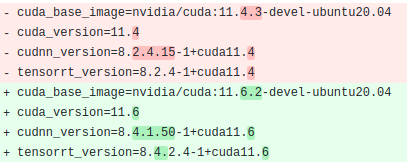
Autoware 설치 페이지에는 CUDA, cuDNN, TensorRT가 필요하다고만 나와있고 버전은 나오지 않았다. 그래서 repository의 amd64.env 파일을 확인하여 설치 매뉴얼에서 요구하고 있는버전을 확인하였다.
nvidia 드라이버 설치
이전에 설치한 드라이버가 인식이 되지않아, 아래 링크를 참고하여 다시 설치하였다. 참고로 nomodeset 설정은 OS 선택 화면에서 e를 눌러 부팅 설정으로 진입한 다음, quiet splash 뒷부분에 nomodeset을 추가해준 다음 F10을 눌러 부팅한다. 부팅 후에는 CLI모드로 진입(Ctrl + Alt + F2)한다.
드라이버 버전은 nvidia-driver-510으로 했다(CUDA 11.6)
nvidia 드라이버를 별도로 설치하고, CUDA를 설치하려고하면 의존성 에러가 많이 발생하였다. 그러므로 CUDA를 설치하면서 자동으로 맞는 설치되도록한다.
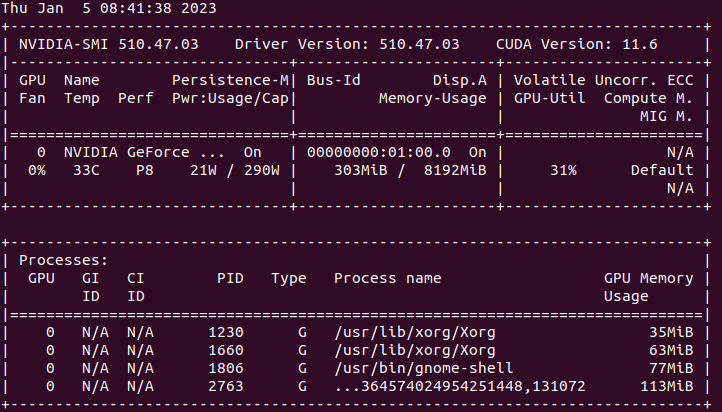
nvidia 드라이버 설치 확인은
nvidia-smi명령어를 통해 확인가능하다.
tar 파일로 직접 build 설치 시 autoware 빌드 시에 에러 발생하므로 cuda, cudnn, tensorrt 모두 debian installation으로 진행할 것.
CUDA 11.6 설치
autoware가 사용하는 CUDA 버전은 11.6.2 인 것으로 확인.
다음 공식 링크를 통해서 설치하였다.
CUDA 설치 사전 체크리스트
https://docs.nvidia.com/cuda/cuda-installation-guide-linux/index.html#pre-installation-actions
CUDA Installation Guide for Linux
The installation instructions for the CUDA Toolkit on Linux. 13. Post-installation Actions The post-installation actions must be manually performed. These actions are split into mandatory, recommended, and optional sections. 13.1. Mandatory Actions Some ac
docs.nvidia.com
Nouveau 비활성화
우분투 기본
https://docs.nvidia.com/cuda/cuda-installation-guide-linux/index.html#disabling-nouveau
CUDA Installation Guide for Linux
The installation instructions for the CUDA Toolkit on Linux. 13. Post-installation Actions The post-installation actions must be manually performed. These actions are split into mandatory, recommended, and optional sections. 13.1. Mandatory Actions Some ac
docs.nvidia.com
runlevel 변경
sudo systemctl set-default multi-user.target
reboot
명령으로 CLI 모드로 변경
CUDA 설치 (Network repo Installation 수행)
CUDA Installation Guide for Linux
The installation instructions for the CUDA Toolkit on Linux. 13. Post-installation Actions The post-installation actions must be manually performed. These actions are split into mandatory, recommended, and optional sections. 13.1. Mandatory Actions Some ac
docs.nvidia.com
Network Installation 과정
wget https://developer.download.nvidia.com/compute/cuda/repos/ubuntu2004/x86_64/cuda-keyring_1.0-1_all.deb
sudo dpkg -i cuda-keyring_1.0-1_all.deb

sudo apt install cuda-11-6
설치 후,
sudo systemctl set-default graphical.target
으로 다시 GUI모드로 변경
CUDA 설치후 과정
https://docs.nvidia.com/cuda/cuda-installation-guide-linux/index.html#post-installation-actions
CUDA Installation Guide for Linux
The installation instructions for the CUDA Toolkit on Linux. 13. Post-installation Actions The post-installation actions must be manually performed. These actions are split into mandatory, recommended, and optional sections. 13.1. Mandatory Actions Some ac
docs.nvidia.com
export PATH=/usr/local/cuda-12.0/bin${PATH:+:${PATH}}
CUDA의 설치확인은
nvcc -V명령어를 통해 확인할 수 있다.

cuDNN 8.4.1 설치
cuDNN 설치 매뉴얼에서 1.3.4.1 섹션을 참고해 Package Manager Installation을 수행.
https://docs.nvidia.com/deeplearning/cudnn/install-guide/index.html#package-manager-ubuntu-install
Installation Guide :: NVIDIA Deep Learning cuDNN Documentation
About this task export QNX_HOST={flash_dir}/toolchains/qnx_toolchain/host/linux/x86_64 export QNX_TARGET={flash_dir}/toolchains/qnx_toolchain/target/qnx7 export HOST_COMPILER=$QNX_HOST/usr/bin/aarch64-unknown-nto-qnx7.1.0-g++ export CUDNN_LIB_PATH=/usr/lib
docs.nvidia.com
OS=ubuntu2004

wget https://developer.download.nvidia.com/compute/cuda/repos/${OS}/x86_64/cuda-${OS}.pin

sudo mv cuda-${OS}.pin /etc/apt/preferences.d/cuda-repository-pin-600
sudo apt-key adv --fetch-keys https://developer.download.nvidia.com/compute/cuda/repos/${OS}/x86_64/3bf863cc.pub
sudo add-apt-repository "deb https://developer.download.nvidia.com/compute/cuda/repos/${OS}/x86_64/ /"
sudo apt-get update
sudo apt install libcudnn8=8.4.1.50-1+cuda11.6
sudo apt install libcudnn8-dev=8.4.1.50-1+cuda11.6

sudo apt-mark hold libcudnn8 libcudnn8-dev
TensorRT 8.4.2 설치
TensroRT 설치는 아래 매뉴얼의 3.2.1.1 을 참고하였다. 이 과정에서는 패키지 의존성 문제가 발생했는데, 기존에 자동으로 설치된 더 높은 버전을 일일이 삭제해주고, 특정 버전을 설치하여 해결하였다.
https://docs.nvidia.com/deeplearning/tensorrt/install-guide/index.html#maclearn-net-repo-install
rosdistro=galactic
rmw_implementation=rmw_cyclonedds_cpp
base_image=ubuntu:20.04
cuda_base_image=ubuntu:20.04
cuda_version=11.6
cudnn_version=8.4.1.50-1+cuda11.6
tensorrt_version=8.4.2-1+cuda11.6
위 매뉴얼대로는 설치가 원활하지 않아서, autoware 매뉴얼의 설치 커맨드(아래링크)로 간단하게 설치 수행함.
https://github.com/autowarefoundation/autoware/tree/awsim-stable/ansible/roles/tensorrt
GitHub - autowarefoundation/autoware: Autoware - the world's leading open-source software project for autonomous driving
Autoware - the world's leading open-source software project for autonomous driving - GitHub - autowarefoundation/autoware: Autoware - the world's leading open-source software project for au...
github.com
tensorrt_version=8.4.2-1+cuda11.6

sudo apt-get install libnvinfer8=${tensorrt_version} libnvonnxparsers8=${tensorrt_version} libnvparsers8=${tensorrt_version} libnvinfer-plugin8=${tensorrt_version} libnvinfer-dev=${tensorrt_version} libnvonnxparsers-dev=${tensorrt_version} libnvparsers-dev=${tensorrt_version} libnvinfer-plugin-dev=${tensorrt_version}

sudo apt-mark hold libnvinfer8 libnvonnxparsers8 libnvparsers8 libnvinfer-plugin8 libnvinfer-dev libnvonnxparsers-dev libnvparsers-dev libnvinfer-plugin-dev
'Simulation > CARLA' 카테고리의 다른 글
| Autoware installation (0) | 2023.01.20 |
|---|---|
| ROS2 기초(2) (0) | 2023.01.13 |
| ROS2 기초 (0) | 2023.01.11 |
| Carla Autoware (3)- dependencies 설치 (0) | 2023.01.09 |
| Carla Autoware(1)-ROS2 설치 (0) | 2022.11.24 |